Using pnpm in SPFx projects
I am Sergej and I am a Software Architect from Germany (AURUM GmbH). I have been developing on Microsoft technologies for more than 14 years, especially in SharePoint / Microsoft 365. With this blog, I want to share my knowledge with you and also improve my English skills. The posts are not only about SPFx (SharePoint Framework) but also about tips & tricks around the M365 world & developments of all kinds. The posts are about TypeScript, C#, Node.js, Vue.js, Visual Studio/ VS Code, Quasar, PowerShell, and much more. I hope you will find some interesting posts. I would also be happy if you follow me. Greetings from Germany Sergej / $€®¥09@
Typically, an SPFx Project is scaffolded via yo and using the yo @microsoft/sharepoint command. By default, all required node packages are installed using npm as the package manager. But you can also use other package managers like yarn or pnpm. I do not want to explain the difference or how pnpm works here, but I can definitively say that pnpm is a better choice than npm when it comes to creating new projects.
I have always used the "normal" way via npm and never dealt with yarn or pnpm before. When I read up on the different package managers, it was immediately clear I should go for pnpm. It is (almost ever) faster and the file size and also the number of files are smaller.
After some research on the Internet, I found two very good articles by Joel Rodrigues and Andrew Connell, both Microsoft MVPs. Unfortunately, I ran into a few problems when I tried it out. This may be due to SPFx (I use SPFx 1.16.1) or because both articles are from 2018. That is why I decided to write this article. It also contains a tip that each of you can use. Let me surprise you.
Because I reinstalled my PC a few days ago, I had to set everything up again. For this reason, I reinstalled yo, gulp and @microsoft/generator-sharepoint but directly with pnpm. So I took the command from the Microsoft article and replaced npm with pnpm.
pnpm install gulp-cli yo @microsoft/generator-sharepoint --global --shamefully-hoist
However, this is not necessary if you have already installed everything via npm, because gulp and yo can be used globally.
Install pnpm
Of course, before you can use pnpm, you must first install it. I used the PowerShell command is described on the installation page.
iwr https://get.pnpm.io/install.ps1 -useb | iex
But if you prefer npm or another method, just have a look at the official installation guide.
Note: Please check the compatibility of
pnpmwith your installednodeversion
Create a new SPFx Project with pnpm
If you want to create a new project you can use the well-known yo @microsoft/sharepoint command but you have to add the argument --package-manager pnpm.
yo @microsoft/sharepoint --package-manager pnpm
Now the standard build process is done and after that all needed npm packages are installed but with pnpm. The installation of the packages was fast, wasn't it?
I was really impressed by how fast and easy it was. So I wanted to test the standard webpart. But gulp serve threw errors. The package @microsoft/sp-component-base could not be found. Also in the SCSS file the reference to Fluent UI (@import '~@fluentui/react/dist/sass/References.scss';) could not be found.
After some research I found out that I should install all packages with the additional argument --shamefully-hoist.
To get a "clean" installation, I deleted the node_modules folder (here is an article of mine describing how to do it faster). Additionally, I deleted the file pnpm-lock.yaml (the equivalent to package-lock.json from npm). Then I executed the command
pnpm install --shamefully-hoist
Now also much more files came within the node_modules folder and also a gulp serve could be executed without errors.
You will probably wonder if you have to delete the folder or run a pnpm install --shamefully-hoist every time you want to create a new project. This would be an option, but not a very good one. A better one is to set this option in the .npmrc file. There are two possibilities.
Global .npmrc
To set the Global option, i.e. a rule that should apply to all projects, you can enter this command:
pnpm config set shamefully-hoist true
But: the .npmrc file is used by both pnpm and npm. So if you want to have custom settings ONLY for pnpm, then this should not be set globally (admittedly this setting does not exist for npm, so it could be set globally)
Locale .npmrc
Before you run yo @microsoft/sharepoint --package-manager pnpm, run this command in the project directory:
pnpm config set shamefully-hoist true --location project
Then it will apply only to the current project/folder. The disadvantage here, however, is that this step must not be forgotten. It must be important that it is executed before the yo @microsoft/sharepoint... command.
Optional: Only allow pnpm usage
When you use pnpm on a project, you do not want others to accidentally run npm install or yarn. To prevent developers from using other package managers, you can modify the package.json as follows:
    "scripts": {
        "preinstall": "npx only-allow pnpm"
        //other package.json scripts
    }
//other package.json settings
npm and pnpm compared
I have created two different projects, both are webpart projects with React and the same name. Only one with npm and the other with pnpm.
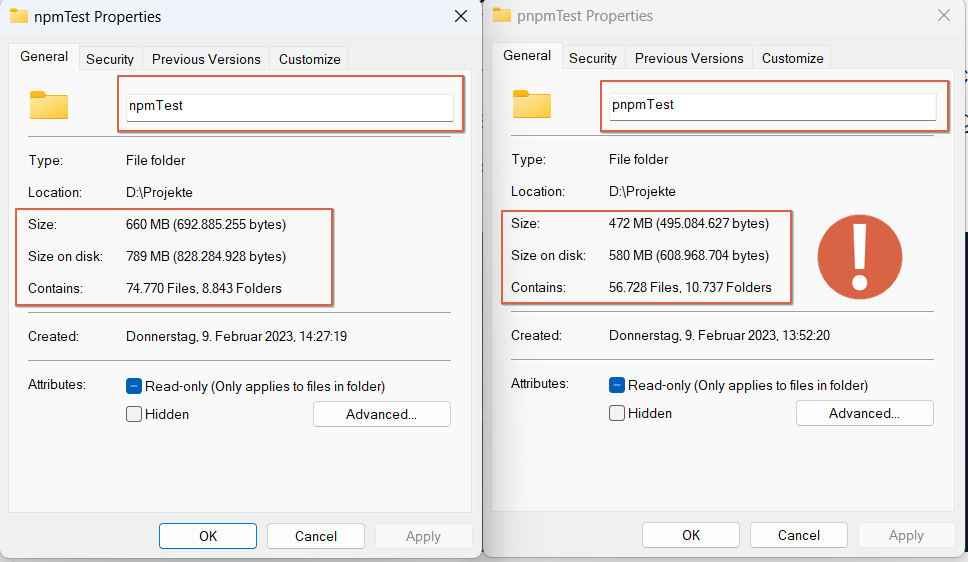
| npm | pnpm | |
| Size | 660 MB | 472 MB (~30% smaller) |
| Files | ~75k | ~57k (~25% less) |
| Folders | ~9k | ~11k (~20% more) |
Summary
If you have chosen a
locale "strategy" of the
.npmrcfile, then before creating a project you have to execute this commandpnpm config set shamefully-hoist true --location projectglobal "strategy" of the
.npmrcfile, then you don't need to do anything (as long as you run it once)
Create a new project as follows:
yo @microsoft/sharepoint --package-manager pnpmOptional: Change the
package.jsonfile to prevent other developers from using other package managers
Bonus
As promised, here is a bonus. Now I will show you how to make it even easier and more automated. The commands are very long and if you have chosen a locale "strategy" of the .npmrc file, then you must always remember to run the other commands first. Maybe you already know the way to define aliases via the registry (regedit) entries or via a cmd file and include (this cmd file) it in the PATH environment variable. But here I want to show something different. And that is about PowerShell aliases and profiles.
Open a new PowerShell window as administrator and run
notepad $profile.AllUsersAllHosts
If a message appears that no profile exists yet, create one. Otherwise, use your existing profile and edit the script file that opens. Now paste this code:
function spfxWithPnpm() {
    pnpm config set auto-install-peers true --location project
    pnpm config set shamefully-hoist true --location project
    yo @microsoft/sharepoint --package-manager pnpm
}

function spfxWithNpm() {
    yo @microsoft/sharepoint
}

set-alias -name spfxNpm -value spfxWithNpm -Scope Global
set-alias -name spfx -value spfxWithPnpm -Scope Global
set-alias -name pn -value pnpm -Scope Global
There are two PowerShell functions. One for the case that a project should still be created with npm. And the other one with pnpm. You could now simply run the spfxWithPnpm command from any PowerShell terminal and it would apply the (local "strategy")(#heading-local-npmrc) of the .npmrc file and create the project with pnpm. Or you could write spfxWithNpm to build it with npm. But to make it even shorter, PowerShell aliases are defined for the functions (yes, you can also just rename the functions, then you don't need the aliases anymore. Or you can handle the complete logic in one function and work with parameters). Finally, an alias is created for pnpm itself, so that you can write pn instead of pnpm (you can of course use whatever you like).
By the way: I have included auto-install-peers in the spfxWithPnpm function. This is an example if you want to make this setting only for pnpm but not for npm. As described before, both package managers use this file. But unlike shamefully-hoist, auto-install-peers is also available for npm. If you choose a global strategy for auto-install-peers, then it affects both npm and pnpm.