How Docker containers eliminate SPFx environment setup
Serve multiple SPFx/Node.js versions on one environment without installation
I am Sergej and I am a Software Architect from Germany (AURUM GmbH). I have been developing on Microsoft technologies for more than 14 years, especially in SharePoint / Microsoft 365. With this blog, I want to share my knowledge with you and also improve my English skills. The posts are not only about SPFx (SharePoint Framework) but also about tips & tricks around the M365 world & developments of all kinds. The posts are about TypeScript, C#, Node.js, Vue.js, Visual Studio/ VS Code, Quasar, PowerShell, and much more. I hope you will find some interesting posts. I would also be happy if you follow me. Greetings from Germany Sergej / $€®¥09@
The SharePoint Framework (SPFx) is a package that is updated very often. On the one hand, this is very good, but on the other hand, it is also a problem. Because, depending on the version, it uses different node, npm, TypeScript, and React versions (and of course other packages). The first SPFx version (1.0.0), released almost exactly 5 years ago, requires Node v6 LTS and npm v3.
The SPFx version 1.4.1 (for SP 2019 on-premises) already supported Node v8 LTS and also npm v4.
Yesterday (February 17, 2022) SPFx was released in version 1.14. This Version requires at least Node v12 LTS. You can find a listing of compatible versions here.
That's no problem, you might think. Then the latest version is installed or updated to the latest version. Well, it's not quite that simple. What if you still have "old" projects. Projects that you have to continue to maintain and that were developed for SP2019 or even SP2016, for example. Because installing two different Node versions at the same time is not possible on one computer. Sure, you can use a VM. But then you have many VMs that also consume CPU/RAM and especially disk space unnecessarily. And you have to set up each of them.
Setup the docker Container
My next project (not SharePoint) is supposed to use Docker. Docker is of course a term I know, after all, everyone talks about it. But I had no experience with it. To not start with this project without knowledge about Docker, I watched a super good video on Youtube (in German) by Golo Roden two days ago (BTW: You can find the same article in German here). He explained it insanely well and I now probably have more than basic knowledge about Docker. After that I thought, actually, you could create something like that for SPFx. Then you wouldn't have to set up the environment at all (saves time) and you can use different versions at the same time. Before I create my own Dockerfile, I checked if there is already a Docker image for SPFx. There is one. I wanted to try that out right away. By the way, I'm not going to go into how you set up/install Docker or what it is, how it works, or how to use it. That's not relevant to the article either. There is also no Docker knowledge required.
Two days ago SPFx 1.14 was not officially released. Therefore I downloaded the image for SPFx 1.13. The documentation for the Docker image is quite good, however, I stumbled upon a couple of obstacles. Already in the first step!
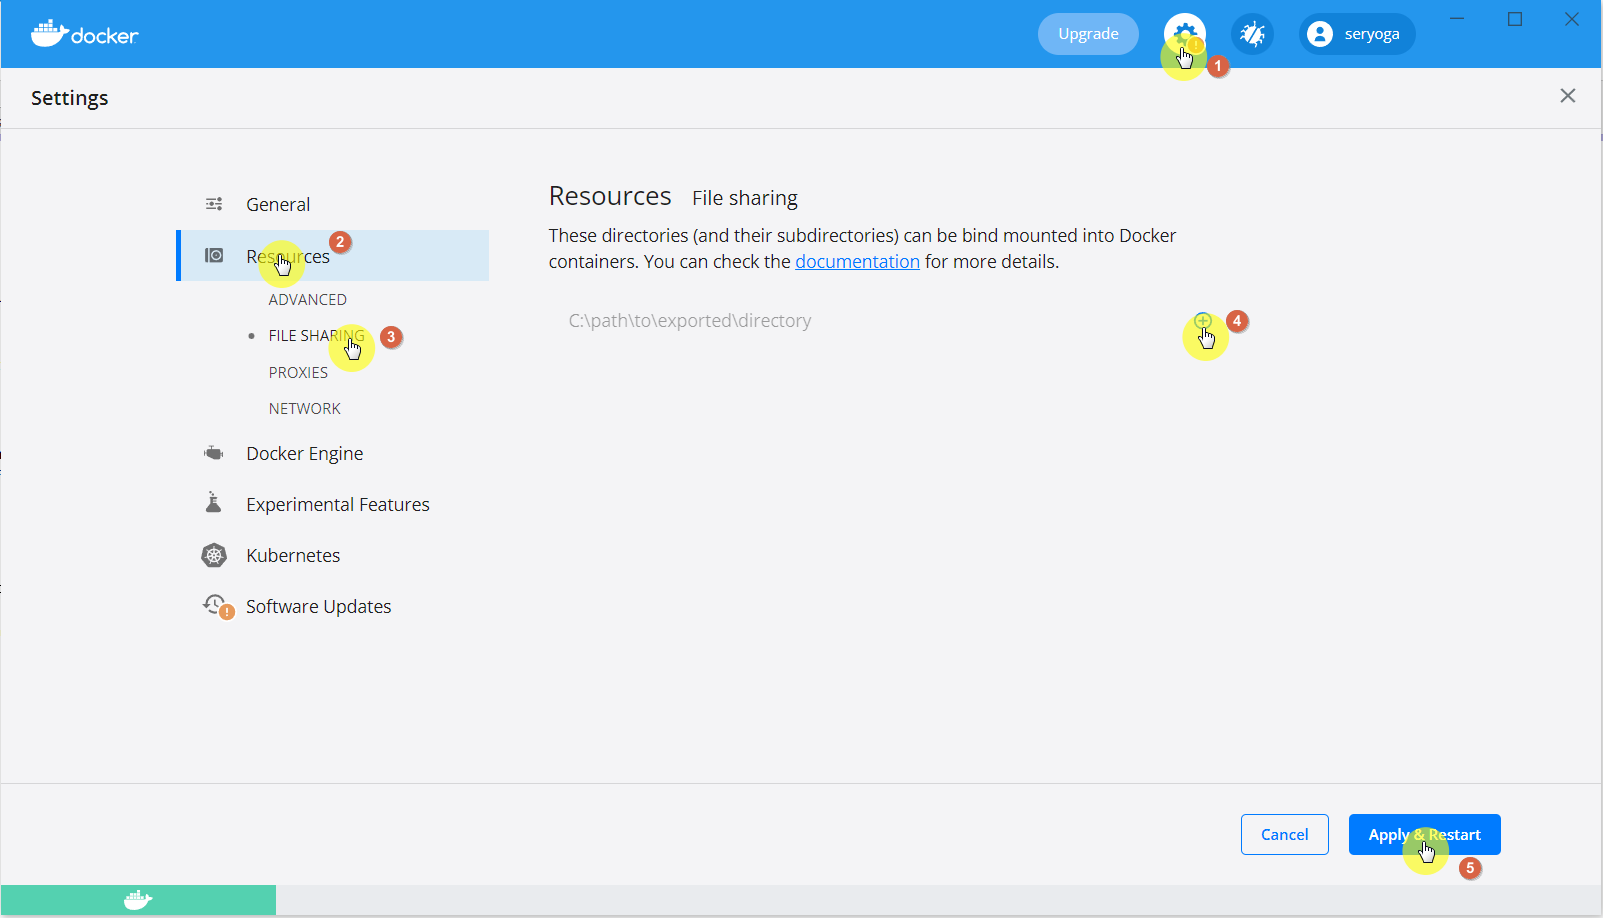
in Docker Settings > Shared Drives verify that the drive where you create your projects is shared
This setting does not exist for me! This has several reasons. The "Shared Drive" has not been available under Docker Desktop for quite some time. Actually, it should be under Docker Settings > Resources > File Sharing.
Yes, I know, I need to update my Docker Desktop 😜
But even this setting is not to be found in my case. It must be said that I have a Windows 10 operating system and use WSL 2 (Windows Subsystem for Linux).
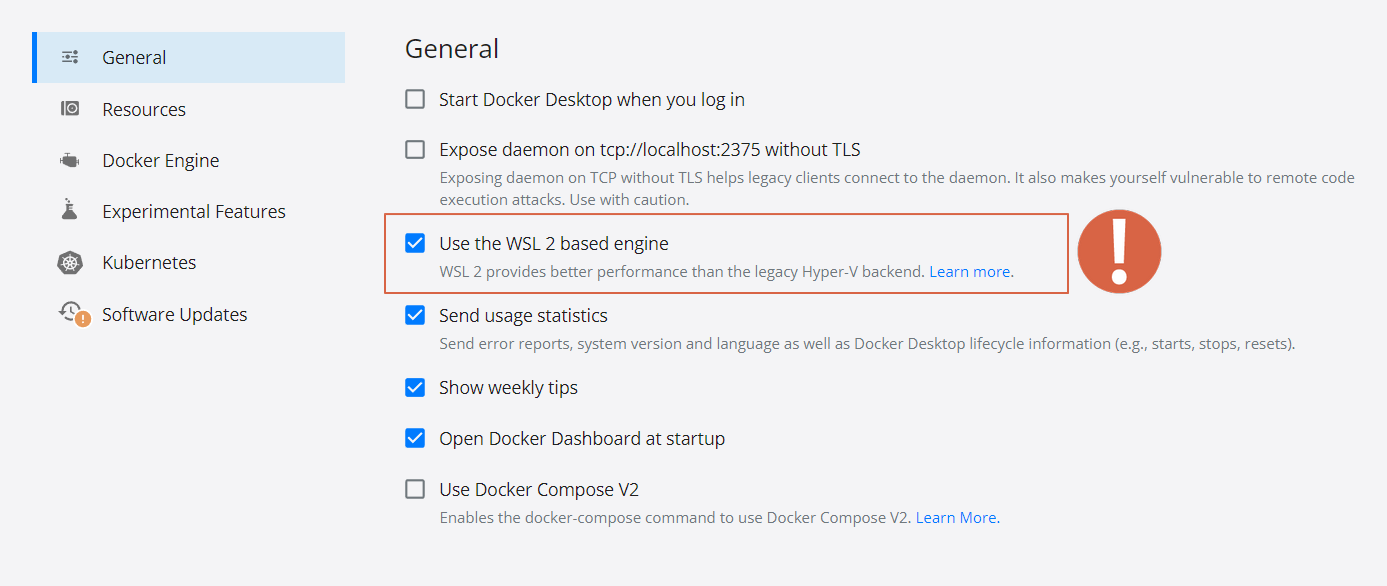
Under WSL 2, you don't need a file share because everything runs on the local machine instead of on a Hyper-V backend.
After I figured that out, I wanted to get started on the next steps. So I created a folder. Then entered the command there as described in the documentation:
docker run -it --rm --name spfx-helloworld -v ${PWD}:/usr/app/spfx -p 4321:4321 -p 35729:35729 m365pnp/spfx
Let me briefly explain the commands:
docker run creates a new container
-it stands for interactive, i.e. you stay "in the container" after creating it. This is mostly a terminal/bash window
--rm means that after the container is terminated, it will be deleted as well.
--name is the name of the container
-v is the volume mapping. The current local path (${PWD}) is mapped to the container path usr/app/spfx.
-p stands for port. This maps the local port 4321 to the container port 4321. And the port 35729 with the container port 35729.
And finally the name of the image is specified ==> m365pnp/spfx.
The container is created and a shell opens. This shell is the shell of the container. That's why you have to specify all your yo, npm, gulp and other commands there and not on the local computer.
That means, after the yo @microsoft/sharepoint command, type all your npm, gulp etc. commands. Only when you are 100% done (e.g. package published, testing finished etc.), enter exit. After that, the container is finished and will be deleted immediately because of the --rm parameter. But don't worry, not the project. It is on your local computer. If you want to work with the project later, you simply have to create the container again (in the project directory) as described above.
Theoretically, you could now serve the project with gulp serve. But this will not work the first time. This is also described in the Docker image documentation. Because you first need to edit the serve.json file, which is located in the config folder. For this, you have to set the hostname to 0.0.0.0.
{
  "$schema": "https://developer.microsoft.com/json-schemas/core-build/serve.schema.json",
  "port": 4321,
  "hostname": "0.0.0.0",
  "https": true,
  "initialPage": "https://yourtenant.sharepoint.com/_layouts/workbench.aspx"
}
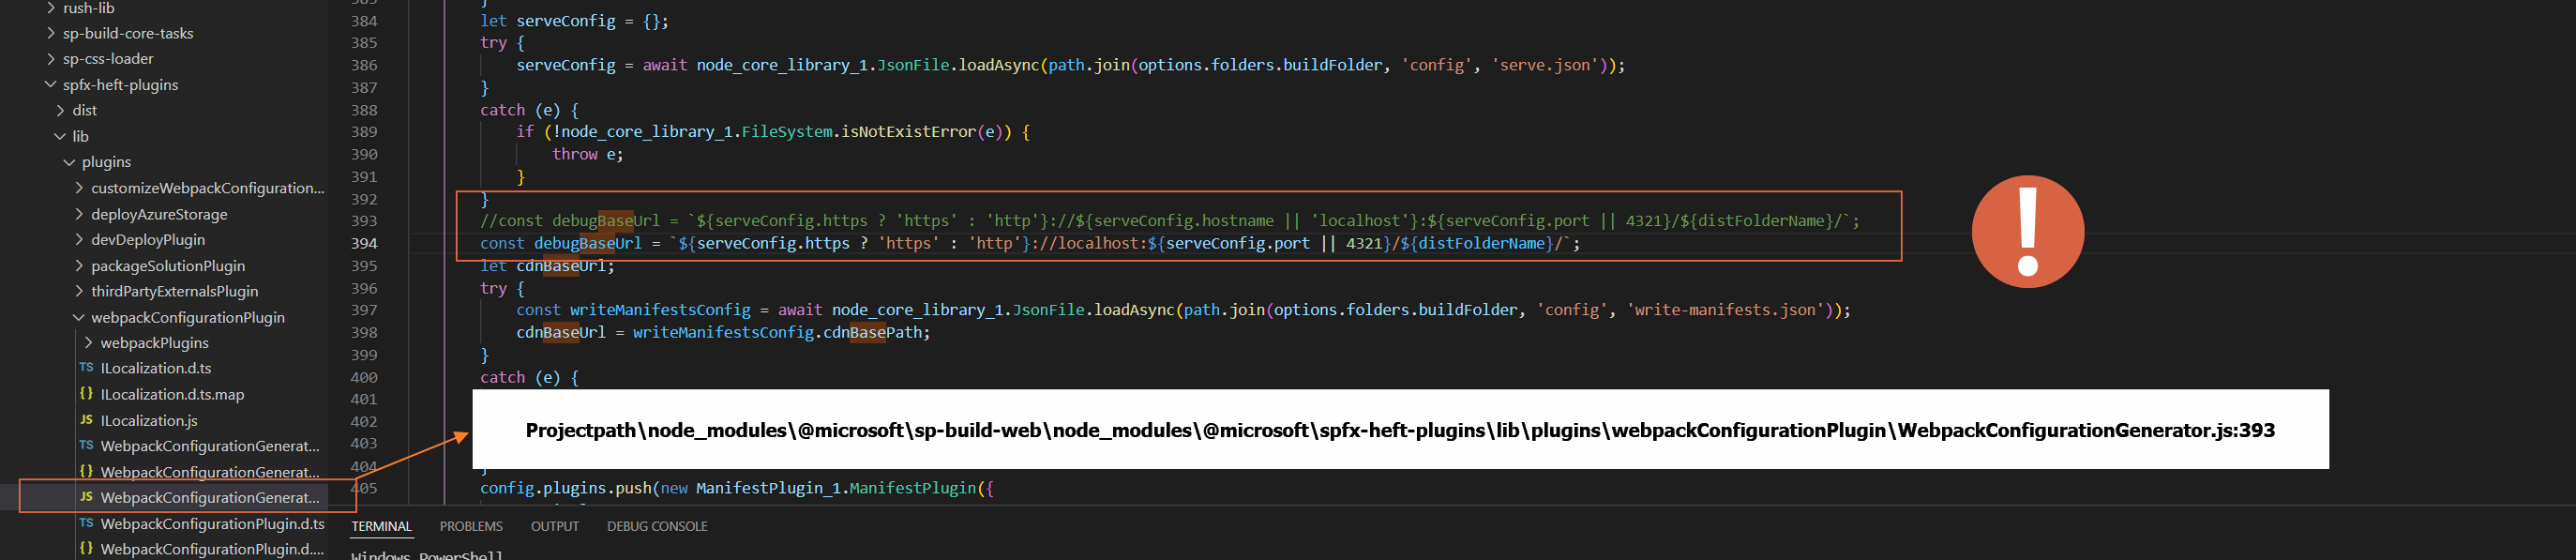
Because I used - as described at the beginning - the SPFx version 1.13, according to the instructions, I also had to edit a JavaScript file in line 393, which should be located here:
node_modules\@microsoft\spfx-heft-plugins\lib\plugins\webpackConfigurationPlugin\WebpackConfigurationGenerator.js
But this is not correct either. Because this file is located under:
node_modules\@microsoft\sp-build-web\node_modules\@microsoft\spfx-heft-plugins\lib\plugins\webpackConfigurationPlugin\WebpackConfigurationGenerator.js
You don't have to do this step anymore in the new SPFx version 1.14. Microsoft itself now checks whether you are in a container or not (by ipAddress-Property in serve.json). If you are using a different version, please check the Docker image documentation to see if there is anything else you need to be aware of. By the way, version 1.14 also fixed my reported bug with the Fullmask Permission Check 😊
Now you could run gulp serve and call the SharePoint workbench. https://{tenant}.sharepoint.com/_layouts/15/workbench.aspx
But you will find that your component is not present/listed. This issue is not listed at all in the Docker Image documentation. The reason is that the certificate is not trusted. It doesn't matter if you already ran gulp trust-dev-cert on your local environment or if you did it in the container. To display the SPFx component you have to call the URL https://localhost:4321 (on the local environment). After that, you have to trust the certificate.
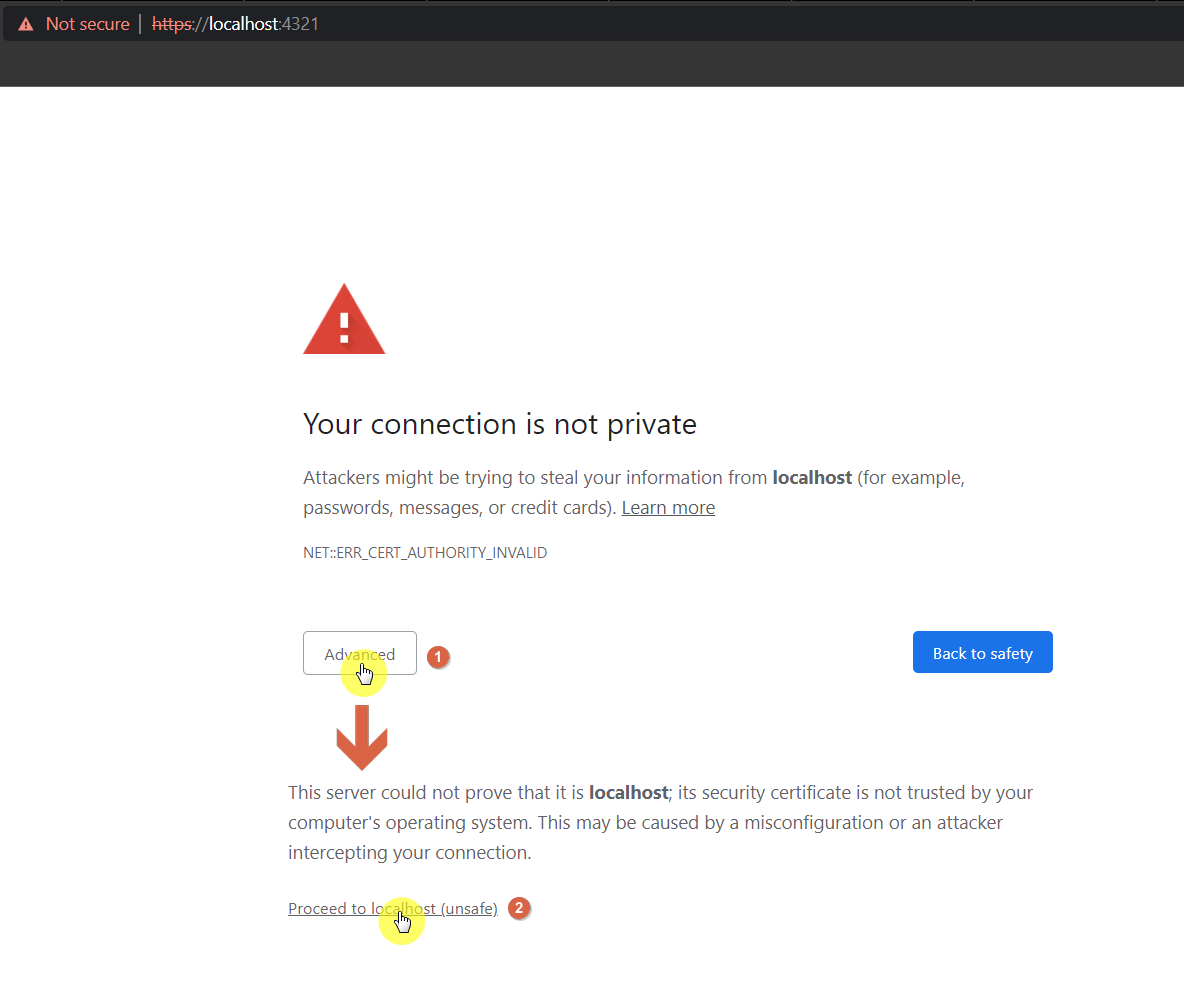
Your component should now be listed in the workbench (or wherever).
SPFx Fast Serve in Docker Container
I am a very big fan of the spfx-fast-serve Package (if you don't know it, you must use it!). That's why I tried to use spfx-fast-serve in this container too. There was a GitHub issue related to Docker Container for this package, which was already solved, but the "workaround" was not acceptable to me like this. Therefore I tried to solve the problem in a different way. Since yesterday there is also a solution for this. Sergei Sergeev, the author of the package, will now officially include my solution in his readme.
To use spfx-fast-serve in your container, you just have to open fast-serve/webpack.extend.js and adjust the constant webpackConfig:
const webpackConfig = {
  devServer: {
    host: '0.0.0.0',
    publicPath: 'https://0.0.0.0:4321/dist/',
    sockHost: 'localhost',
    watchOptions: {
      aggregateTimeout: 500, // delay before reloading
      poll: 1000 // enable polling since fsevents are not supported in docker
    }
  },
  output: {
    publicPath: 'https://0.0.0.0:4321/dist/'
  }
}
Now the npm run serve command also works in the container.
Custom Docker image. 70% Smaller and with spfx-fast-serve
The official Docker image is already very good and helpful. What I didn't like was the image size. It is 1.22 GB and I didn't want to install the spfx-fast-serve package all the time. Therefore I thought about creating my own image. I learned in the Youtube Video that the Linux Alpine operating system is much smaller. Because it is delivered without certain packages, which the other Linux distributions use. This means that with the SPFx Docker Image, the Linux distribution takes up so much space or better said, the used Node image uses this Linux version. But you can also use Node in the Alpine version. So I copied the original Dockerfile and made it "Alpine"-Ready. Because the commands for Alpine are different from those of Ubuntu, Debian etc. I translated it, so to speak.
The result is the following Dockerfile with the default integration of the package spfx-fast-serve:
FROM node:14.19.0-alpine3.15

EXPOSE 5432 4321 35729

ENV NPM_CONFIG_PREFIX=/usr/app/.npm-global \
  PATH=$PATH:/usr/app/.npm-global/bin

VOLUME /usr/app/spfx
WORKDIR /usr/app/spfx

RUN apk add sudo && \
    apk --no-cache add shadow && \
    echo '%wheel ALL=(ALL) ALL' > /etc/sudoers.d/wheel && \
    adduser --home "$(pwd)" --disabled-password --ingroup wheel --shell /bin/ash spfx && \
    usermod -aG wheel spfx && \
    chown -R spfx:wheel /usr/app

USER spfx

RUN npm i -g gulp@4 yo @microsoft/generator-sharepoint@1.13.1 spfx-fast-serve

CMD /bin/ash
If you compare the image sizes, my image is 70% smaller, and only 400MB.

In this container you have to do the same steps I described above. After creating the solution you can run spfx-fast-serve once (it doesn't need to be installed anymore, that was done in the Docker image) and then npm i and you can use npm run serve.
That's it. Happy Coding ;)