Create your NPM package with TypeScript in a few minutes

I am Sergej and I am a Software Architect from Germany (AURUM GmbH). I have been developing on Microsoft technologies for more than 14 years, especially in SharePoint / Microsoft 365. With this blog, I want to share my knowledge with you and also improve my English skills. The posts are not only about SPFx (SharePoint Framework) but also about tips & tricks around the M365 world & developments of all kinds. The posts are about TypeScript, C#, Node.js, Vue.js, Visual Studio/ VS Code, Quasar, PowerShell, and much more. I hope you will find some interesting posts. I would also be happy if you follow me. Greetings from Germany Sergej / $€®¥09@
npm is well known and popular and almost indispensable in web development. In this post, I show you how to create and publish your own npm package in a few minutes. Today I published my first npm package and I want to share the experience with you.
Let's start
Sign up to npmjs
First, of course, you need an account on npmjs.com. Choose a name and enter your data. Confirm the email address and activate your account. I also recommend to activate the 2 factor authentication (you can find it under "Account").
Create your Project
Note: node and npm must already be installed.
Create a folder for your project and open this (empty) folder path with VS Code (you can also use another IDE, but I prefer VS Code). Now open the terminal and enter the command npm init -y.
The -y parameter ensures that a standard package.json file is generated. We will modify this file later. You can also omit it and enter the values directly.
Add TypeScript as a Dependency
Now let's add TypeScript as a dependency. You can define dependencies and devDependencies. The difference between these two, is that devDependencies are modules which are only required during development, while dependencies are modules which are also required at runtime. This stackoverflow answer describes well the difference between these two..
For TypeScript we need devDependencies. To install it as devDependencies, you need to enter the following command: npm install --save-dev typescript or the shorthand npm i -D typescript.
Create a tsconfig.json file
To be able to compile TypeScript, we need a tsconfig.json file in the root directory of our project. For this we enter the command tsc --init in the terminal. The file should have been created automatically afterward. The initial content of the created file should then be like this (if you remove the commented out options):
{
  "compilerOptions": {
    "target": "es5",                          /* Specify ECMAScript target version: 'ES3' (default), 'ES5', 'ES2015', 'ES2016', 'ES2017', 'ES2018', 'ES2019' or 'ESNEXT'. */
    "module": "commonjs",                     /* Specify module code generation: 'none', 'commonjs', 'amd', 'system', 'umd', 'es2015', or 'ESNext'. */
    "strict": true,                           /* Enable all strict type-checking options. */
    "esModuleInterop": true,                  /* Enables emit interoperability between CommonJS and ES Modules via creation of namespace objects for all imports. Implies 'allowSyntheticDefaultImports'. */
    "forceConsistentCasingInFileNames": true  /* Disallow inconsistently-cased references to the same file. */
  }
}
I then changed it as follows:
{
  "compilerOptions": {
    "target": "es5",                          /* Specify ECMAScript target version: 'ES3' (default), 'ES5', 'ES2015', 'ES2016', 'ES2017', 'ES2018', 'ES2019' or 'ESNEXT'. */
    "module": "esnext",                     /* Specify module code generation: 'none', 'commonjs', 'amd', 'system', 'umd', 'es2015', or 'ESNext'. */
    "lib": ["es5",
      "dom",
      "es2015",
      "es2015.collection"],                             /* Specify library files to be included in the compilation. */
    "declaration": true,                   /* Generates corresponding '.d.ts' file. */
    "declarationMap": true,                /* Generates a sourcemap for each corresponding '.d.ts' file. */
    "sourceMap": true,                     /* Generates corresponding '.map' file. */
    "outDir": "lib",                        /* Redirect output structure to the directory. */

    /* Strict Type-Checking Options */
    "strict": false,                           /* Enable all strict type-checking options. */


    /* Module Resolution Options */
    "moduleResolution": "node",            /* Specify module resolution strategy: 'node' (Node.js) or 'classic' (TypeScript pre-1.6). */
    "esModuleInterop": true,                  /* Enables emit interoperability between CommonJS and ES Modules via creation of namespace objects for all imports. Implies 'allowSyntheticDefaultImports'. */

    /* Advanced Options */
    "forceConsistentCasingInFileNames": true,  /* Disallow inconsistently-cased references to the same file. */
  },
  "include": [
    "src/**/*.ts",
  ],
  "exclude": [
    "node_modules",
    "lib"
  ]
}
You can, of course, choose the options that suit you.
Implement your Code
Typically, you create an index.ts file in the src folder that contains the contents of your package. This file often only has exports to other files. My index.ts looks like this:
export * from './functions';
Update package.json
After we have finished the code, we go back to the package.json file. Because this is important for the publishing. The default package.json file looks something like this:
{
  "name": "my_package_folder_name",
  "description": "",
  "version": "1.0.0",
  "scripts": {
    "test": "echo \"Error: no test specified\" && exit 1"
  },
  "repository": {
    "type": "git",
    "url": "https://github.com/SPFxAppDev/my_package_folder_name.git"
  },
  "keywords": [],
  "author": "",
  "license": "ISC",
  "bugs": {
    "url": "https://github.com/SPFxAppDev/my_package_folder_name/issues"
  },
  "homepage": "https://github.com/SPFxAppDev/my_package_folder_name"
}
Now we need to adjust some values. The most important one is the name. This determines what your package is called, so what is after npm install. I have chosen @spfxappdev/utility. That means to install the package, you would have to run the command npm i @spfxappdev/utility. The @spfxappdev is a so called npm scope and can only be provided publicly with the free subscription.
After that, I added the following values and changed the other, default values:
"main": "lib/index.js",
  "types": "lib/index.d.ts",
  "files": [
    "lib"
  ],
  "scripts": {
    "prepublish": "tsc"
  },
The final file looks like this:
{
  "name": "@spfxappdev/utility",
  "version": "1.0.0",
  "description": "",
  "main": "lib/index.js",
  "types": "lib/index.d.ts",
  "files": [
    "lib"
  ],
  "scripts": {
    "prepublish": "tsc"
  },
  "repository": {
    "type": "git",
    "url": "git+https://github.com/SPFxAppDev/ts-utility.git"
  },
  "keywords": [
    "typescript",
    "spfx",
    "utility",
    "typescript utility functions"
  ],
  "author": "Seryoga",
  "license": "ISC",
  "bugs": {
    "url": "https://github.com/SPFxAppDev/ts-utility/issues"
  },
  "homepage": "https://github.com/SPFxAppDev/ts-utility#readme",
  "devDependencies": {
    "typescript": "^4.3.5"
  }
}
Add README.md
The README.md is not only important for the repository and other developers, it is also displayed on the npm page of the package. This is then the description of your package, how to use it, etc.
Add .gitignore (optional)
If you upload your code to a git repository, include a .gitignore file. This should ignore the following folders:
# Logs
logs
*.log
npm-debug.log*

# Dependency directories
node_modules

# Build generated files
lib
npm pack & npm link
Theoretically, you could already publish the package, but you don't know what exactly will be published - besides, you might want to test it in another project. Therefore npm pack is used now.
Run this command in the terminal and see what gets packed as a tarball. Does the structure fit? Is anything missing? Is there something too much (delete the lib-folder and try again)?
If you want to test the package beforehand, then run the command npm link. This command makes a link in the global npm folder (same directory where all npm i -global packages are stored). After that, the package can be used in another project using npm i {pathToGlobalFolderOfYourProject} or npm link {yourPackageName}
Publish the package
Everything is now ready. Everything works and the package is ready to be released. Of course you have to authenticate yourself in VS Code first.
Login to npmjs
To do this, you need to run the following command in VS code npm adduser (aliases: npm login and npm add-user). In the terminal you must now enter your user credentials and, if necessary, the code for the 2 factor authentication.
Publish to npmjs
The last step is quite simple, you just have to run npm publish in the terminal. In my case, I have to add --access public because of the scope and the subscription and because I want to make it public.
Result
The package is now published. Yeah :-). Congratulations. Go to your npm account and see the result. Here is a picture.
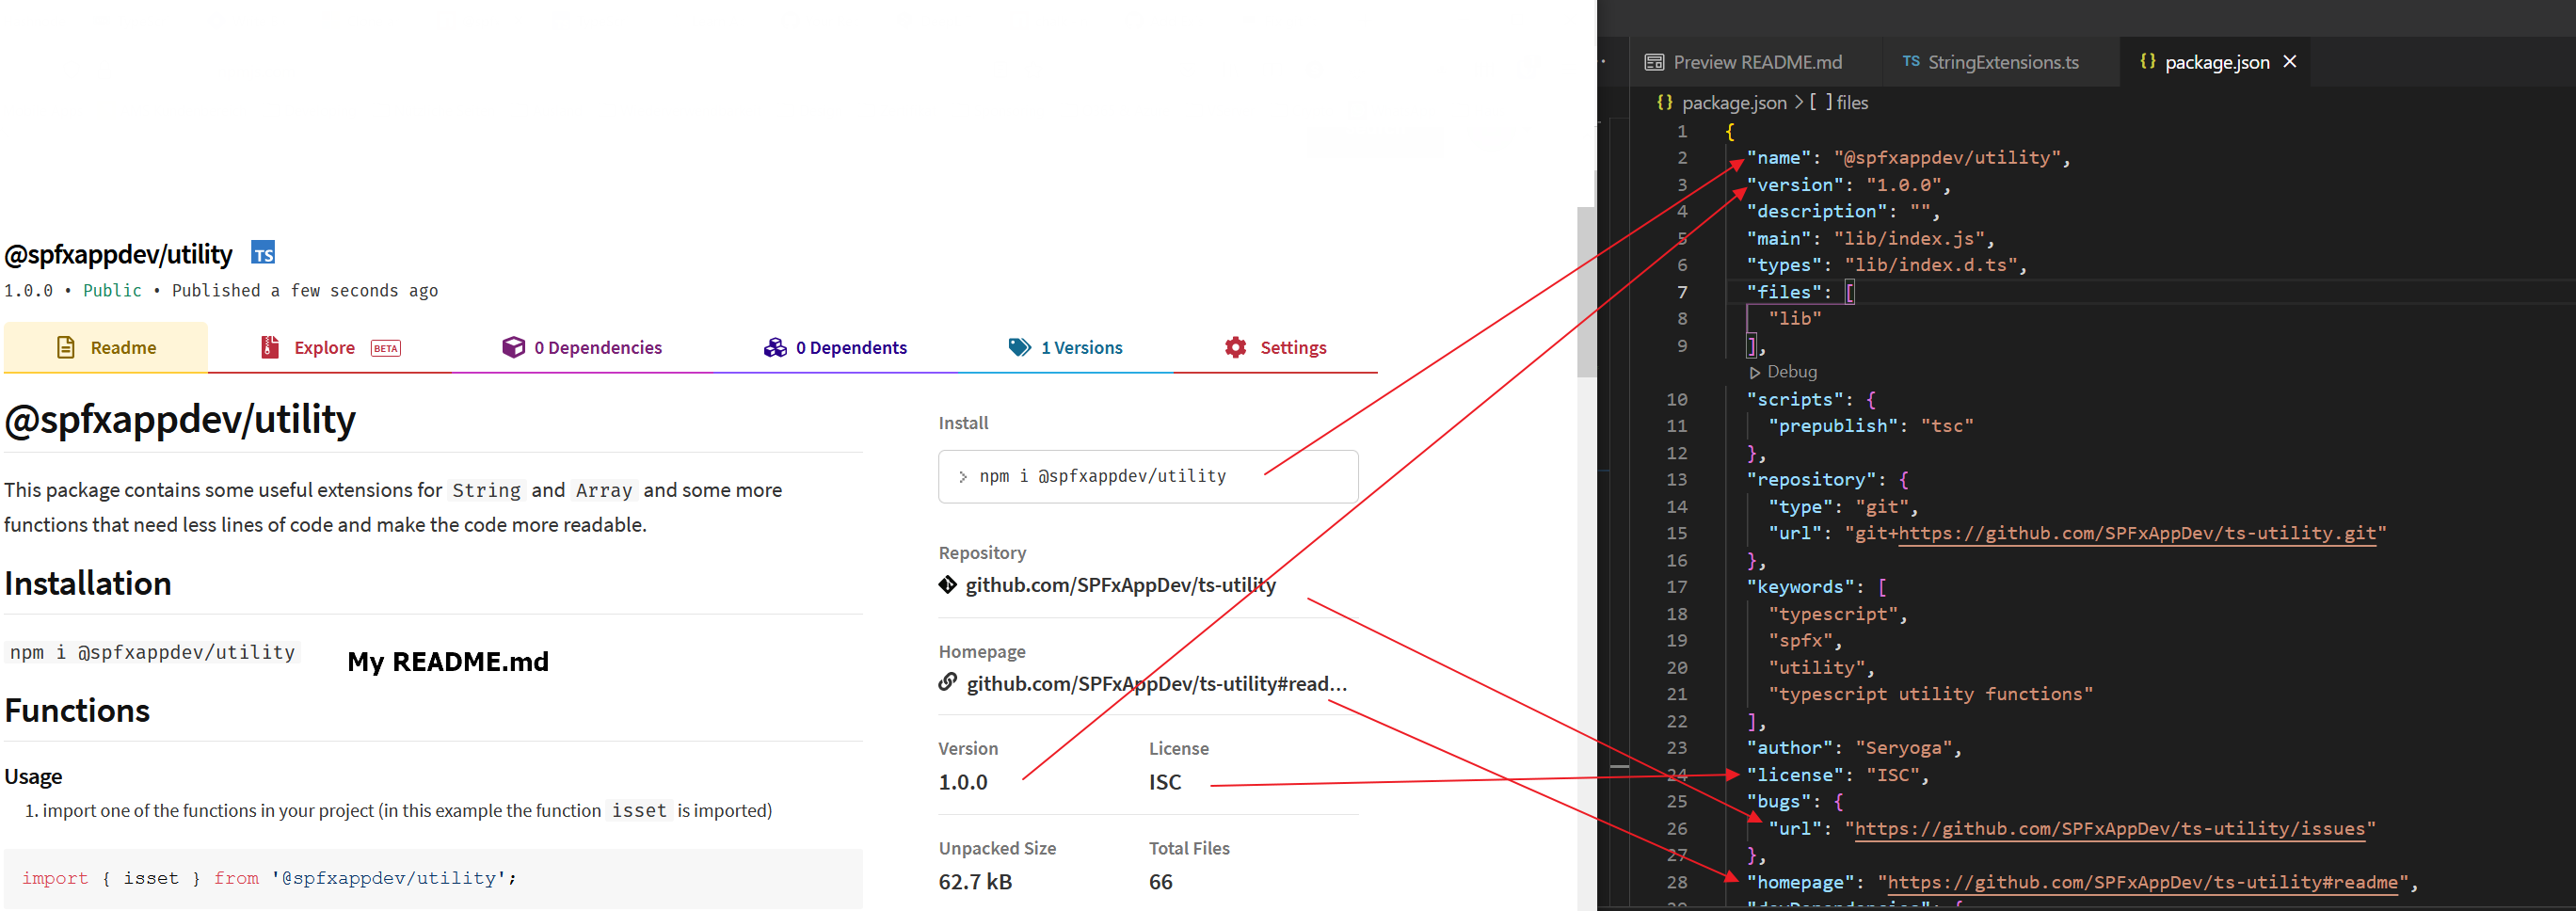
And here again the link to my package
Happy Coding ;-)